-
Pelican Connect
-
- Tips for Evaluating Notifications in the Pelican System
- Thermostat Notification Configurations
- Thermostat Unreachable
- Understanding a “Cool Failure” Notification
- Understanding a “Heat Failure” Notification
- Understanding an “Economizer Position Failure” Notification
- Understanding the “Door or Window Has Been Left Open” Notification
- Understanding Low Battery Notifications for Pelican Devices
-
Admin
-
- Can I pay for multiple site subscriptions at once?
- Can I pay for my subscriptions using a purchase order (PO)?
- How do I change my site type (residential, business, hotel)?
- How do I pay for my site’s subscription?
- What does the Standard Subscription provide?
- What is the Subscription Renewal History?
- Why has my subscription expired?
- How do I view my LTE Gateway Subscription Receipt?
- How do I change my LTE Subscription Email Address?
- How Can I Cancel My LTE Gateway Subscription?
-
Comfort Control
-
- How do I adjust a room temperature?
- How do I turn off all thermostats for an emergency?
- How do I turn ON-OFF cooling?
- How do I turn ON-OFF heating?
- How do I turn ON-OFF the Fan?
- What does Cool Running mean?
- What does Economizer Active mean?
- What does Fan Running mean?
- What does Heat Running mean?
- What does Space Satisfied mean?
- What does Waiting mean?
- Why did cooling start on its own?
- Why did heating start on its own?
-
- Directions on maintaining proper ventilation rates: COVID-19
- What is Outside Ventilation in a schedule?
- Does Pelican adjust an outside damper based on fan speed?
- How do I adjust the CO2 level to generate additional ventilation?
- How do I commission a PEARL for proper ventilation?
- How do I turn off ventilation for all thermostats on a poor outdoor air day?
- What are CO2 Levels?
- What do different CO2 levels indicate ?
- Does Pelican detect CO2 levels as a life safety system?
- How do I adjust my CO2 ventilation configuration?
- What is the Outside Ventilation setting?
-
-
Schedules
- Can I schedule a thermostat to a set points beyond its allowable heat or cool range? - not done
- Can I schedule when Fan Circulation Minutes is active?
- What is unoccupied setback in a thermostat schedule?
- How to set set fan to auto during unoccupied setback periods?
- How do I set an a single thermostat's schedule?
- What is Outside Ventilation in a schedule?
- What are the schedule Repeat options?
- What is optimum start?
- Why did cooling start on its own?
- Why did heating start on its own?
- Scheduling from Dusk to Dawn
-
- How do I create an event schedule for a single thermostat?
- How do I delete an event scheduled for a single thermostat?
- How do I create an event schedule for multiple thermostats?
- How do I edit a multiple thermostat event scheduled?
- How do I delete a multiple thermostat event scheduled?
- How do I edit an event scheduled for a single thermostat?
-
- How do I create shared schedules? - not done
- How do I edit a shared schedule?
- How do I create unoccupied set point override periods?
- How do I rename a shared schedule?
- How do I copy an existing shared schedule?
- How do I delete an existing shared schedule?
- How do I create an event schedule for multiple thermostats?
- How do I edit a multiple thermostat event scheduled?
- How do I delete a multiple thermostat event scheduled?
- Schedule Dashboard Feature Enhancements
-
Thermostat
-
- Can a Pelican thermostat control a floating actuator?
- Can a Pelican thermostat control a two-position actuator?
- Can a Pelican thermostat control a multiple fan speeds?
- Can I "lock-out" compressors based on an outdoor temperature?
- Can I disable or lock a thermostat’s Fan Button?
- Can I disable the thermostat’s internal temperature sensor?
- How do I hide a thermostat on the app?
- How does Pelican assist with freeze prevention?
- How do I control a dual fuel Heat Pump?
- How many Cool Stages do I select for a thermostat?
- How many Fan Stages do I select for a thermostat?
- How many Heat Stages do I select for a thermostat?
- What do I set Heat Needs Fan to?
- What is CO2 Ventilation?
- What is Compressor Lockout?
- What is Cool Range?
- What is Fan Circulation Minutes?
- What is Heat Range?
- What is the difference between Auxiliary and Emergency Heat?
- What should I set a thermostat’s Reversing Valve to?
- What should I set a thermostat’s System Type to?
- What should I set Anticipation Degrees to?
- What should I set Cycles Per Hour to?
- When should I use the thermostat Calibration Degrees?
- What should I set a thermostat’s Zone Controller configuration to?
- What should I set Fan Purge Cycle to?
- What should I set Damper Type to?
- What should I set Reheat Type to?
- What should I set Notification Settings to?
- How to hide a section within an article.
- How can I Delete a Thermostat from a site?
- How do I delete a Wired Temperature Sensor or PEARL Economizer Controller?
- How can I Replace a Thermostat?
- Show all articles ( 18 ) Collapse Articles
-
-
Networking
-
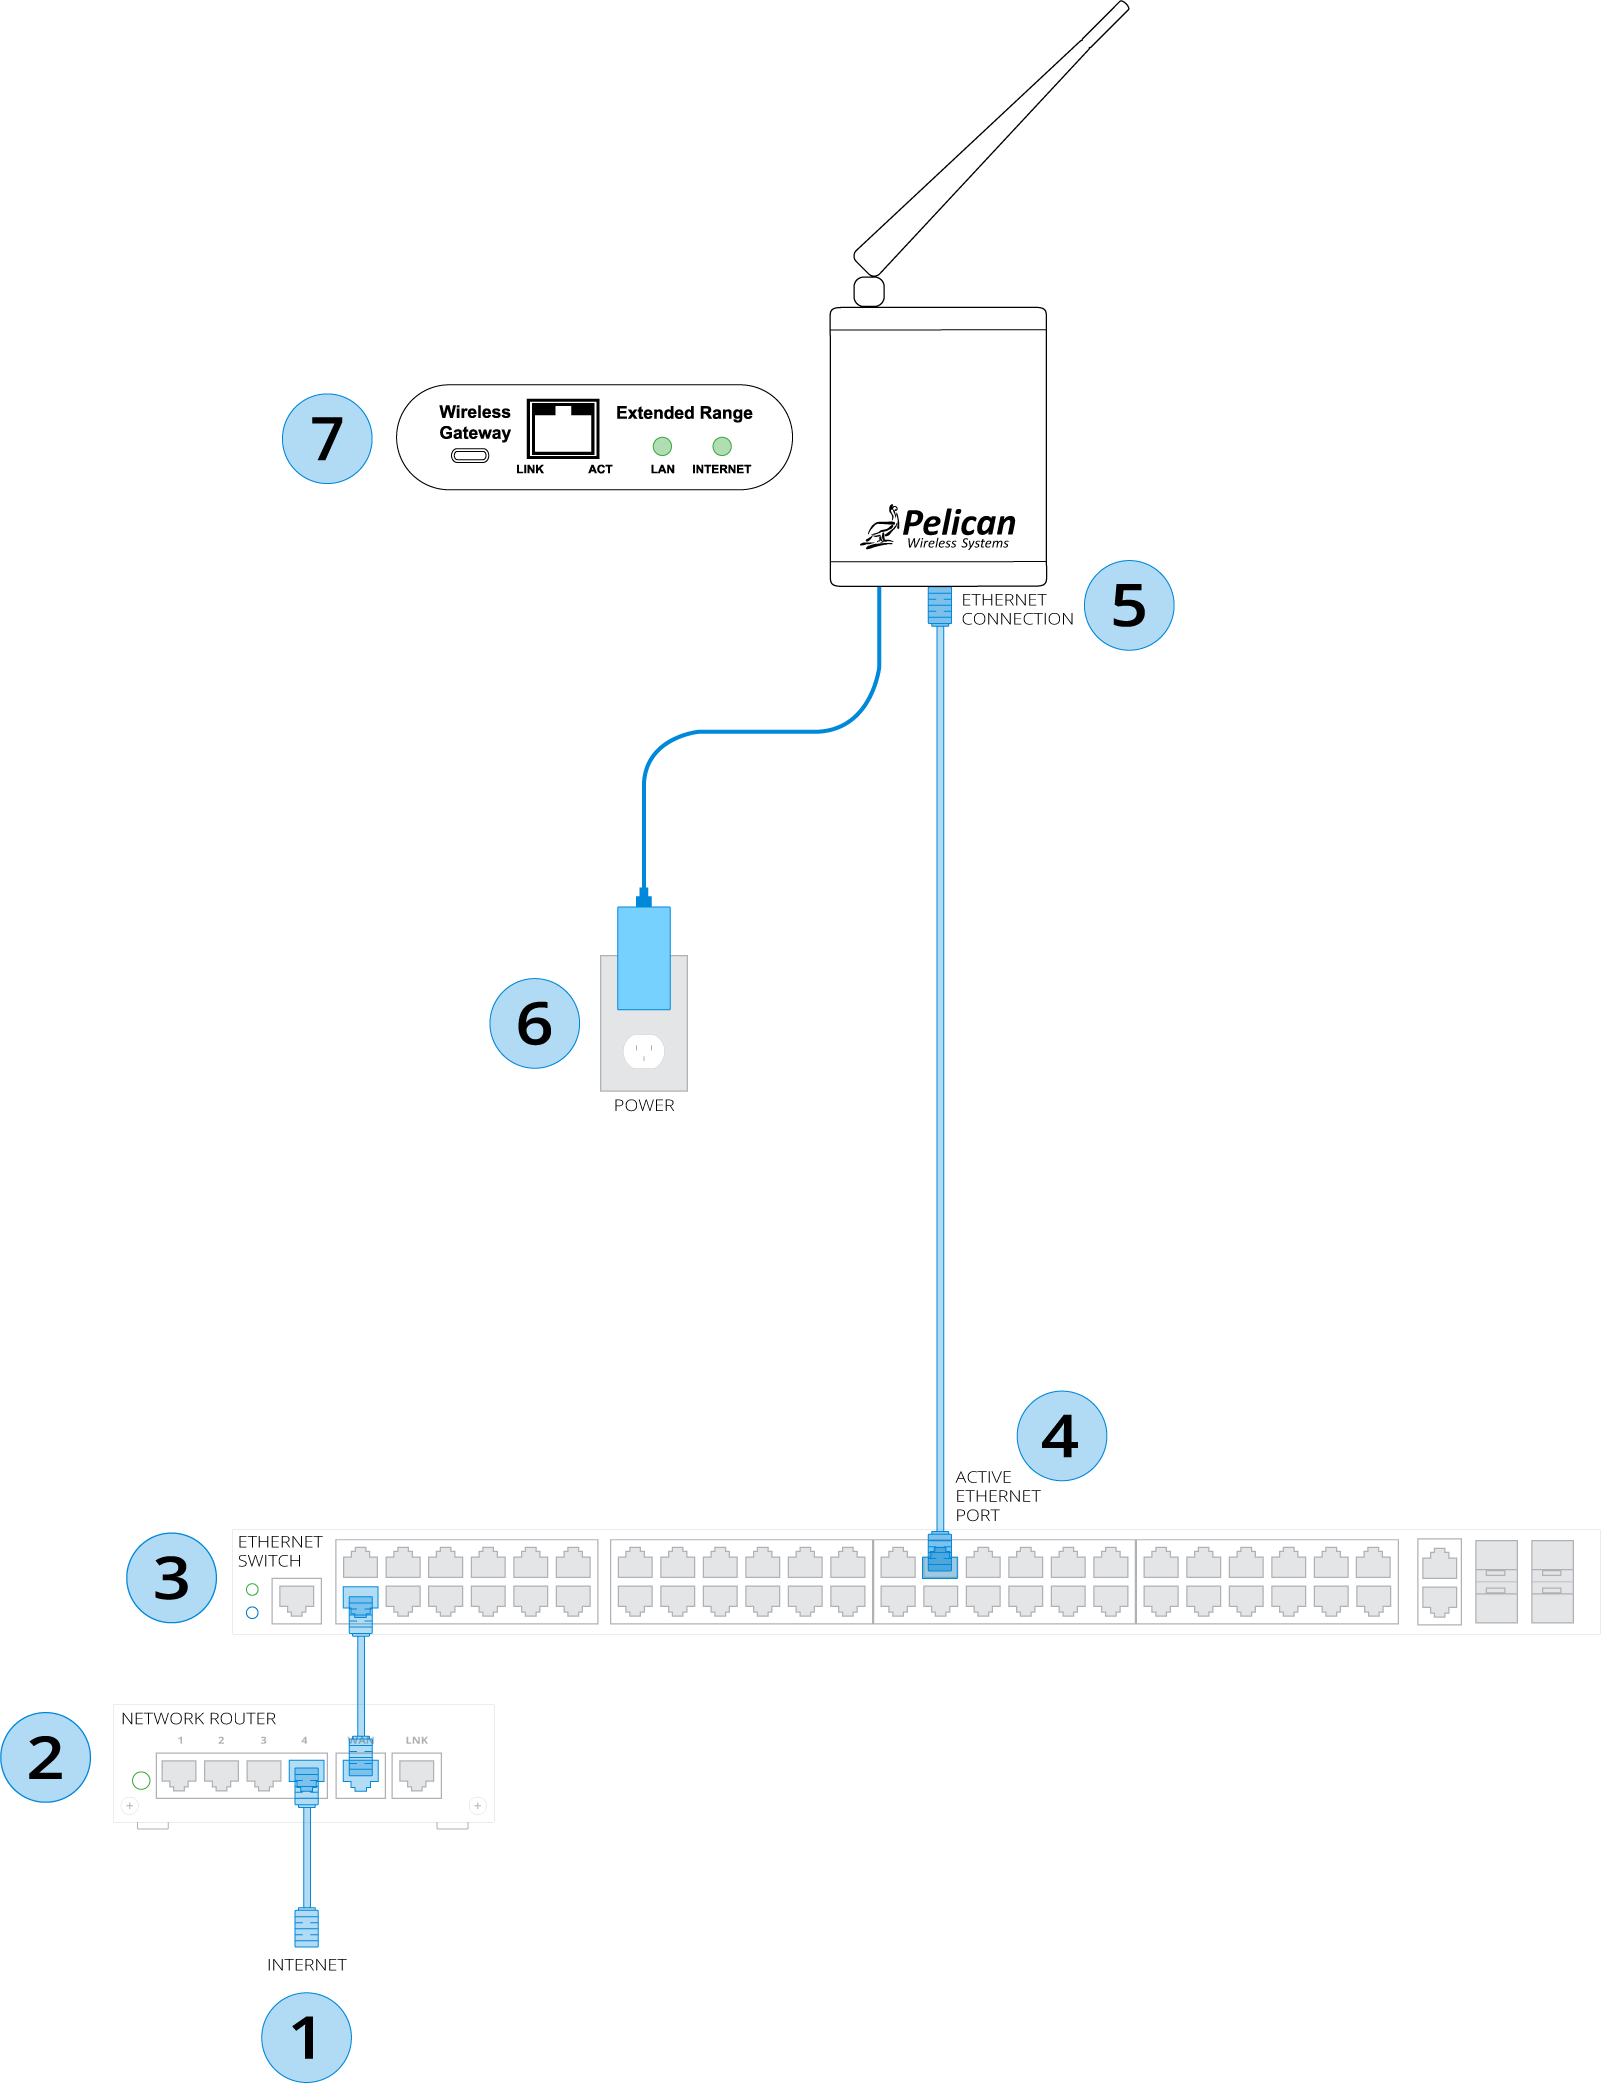
- How do I install a Pelican cellular gateway?
- How do I replace a Pelican Cellular gateway with a Pelican Ethernet gateway?
- Can I set a Pelican gateway for a static IP address?
- Do I need a Public IP address for a Pelican gateway?
- Does a Pelican gateway use a DHCP or static IP address?
- Does a Pelican gateway use Inbound firewall ports?
- How do I change a Pelican gateway from static back to DHCP?
- How do I install a Pelican Ethernet gateway?
-
PEARL
-
Zone Coordinator
-
- How does Pelican control a parallel fan powered box during a heating cycle?
- How does Pelican control a series fan powered box during a heating cycle?
- How does Pelican control a zone box during a heating cycle?
- How does Pelican control a parallel fan powered box during a cooling cycle?
- How does Pelican control a series fan powered box during a cooling cycle?
- How does Pelican control a zone box during a cooling cycle?
- How does Pelican control a parallel fan powered box during a ventilation cycle?
- How does Pelican control a series fan powered box during a ventilation cycle?
- How does Pelican control a zone box during a ventilation cycle?
-
Power Control
-
Sensors
-
OpenAPI
Categories:
Pelican Connect app
New Site Setup
How to Create a New Pelican Site
Creating a new Pelican Site is easy and allows you to manage your Pelican devices efficiently. Follow these steps to get started:

Preparation
1
Ensure Your Pelican Gateway is Installed:
- The Gateway must be powered on and connected to the internet.
- Refer to the Pelican Gateway Installation Guide if needed.
2
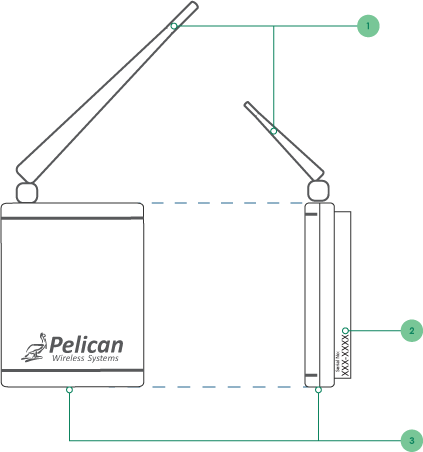
Have the Serial Number Handy: Locate the Gateway’s serial number (e.g., XXX-XXXX) printed on the side of the device.
Setup
1
Go to the Pelican Website:
- Visit www.pelicanwireless.com on your device.
2
Start New Site Setup:
- Click New Site Setup in the upper-right corner of the homepage to open the setup wizard.
3
Enter the Gateway Serial Number:
- Type the serial number exactly as it appears on your device.
4
Provide Your Email:
- Enter a valid email address to receive your site login information.
5
Select Site Type:
- Choose one of the following:
- Business: For commercial, retail, or government locations.
- Residential: For single-family homes.
- Hotel: For hospitality sites using Pelican’s Property Management Interface.
6
Enter Location Details:
- Input the zip code or postal code of the Gateway’s location. This ensures accurate time zone settings.
7
Submit Your Information:
- Click Submit to complete the setup process. Double-check your email for accuracy to avoid delays.
Finalizing Your Site
1
Check Your Email:
- Look for an email from notice@pelicanwireless.com with your temporary password.
- Tip: If you don’t see it, check your spam or junk folder.
2
Log In to Your Site:
- Use your email and temporary password to log in.
- Follow the prompts to create a permanent password.
3
Begin Managing Your Devices:
- Once logged in, you’re ready to configure and monitor your Pelican devices.
Quick Tips
Trouble Receiving Emails?
- Verify the email address entered during setup and check all folders, including spam.
Wrong Site Type?
- No problem, you can change your site type once you are in your Pelican Connect app. Click here for more information.
Need Help?
- Reach out to Pelican Technical Support at support@pelicanwireless.com or call [XXX-XXX-XXXX]. Click here for contact information.
Table of Contents